
Свяжитесь с Тайго



Getting a carbon fiber part out of the mold with the right void content isn’t luck. Prepreg carbon fiber autoclave curing is the process of turning a stack of sticky, resin-rich prepreg sheets into a rigid component using a precisely choreographed series of heat, vacuum, and pressure — and most defects trace back to a single step in that sequence, not the material itself.
Быстрые характеристики
| Autoclave pressure | 50-100 psi (typical range per OSHA’s autoclave molding definition); most commercial epoxy prepreg systems run 5-6 bar (72-87 psi) |
| Cure temperature | 70-180°C, resin-system dependent (see cure-profile table below) |
| Ramp rate | 0.3-2°C/minute |
| Vacuum level target | ≥95%, <5% drop over 10 minutes |
| Типичное содержание пустот | Well under 1% (peer-reviewed data: 0.6-0.8%) |
| Freezer storage | -18°C long-term; 4-8 weeks out-time once thawed (system dependent) |
This walkthrough follows the same process a fabricator actually runs: handling the material, building the vacuum bag layer by layer, seeing what the real pressure and temperature curve inside the autoclave looks like, and knowing where the cure cycle is most likely to go wrong.
A prepreg carbon fiber autoclave is a pressure vessel that cures pre-impregnated carbon fiber laminates using vacuum, heat, and positive gas pressure together. A near-full vacuum (95%) first removes trapped air and volatiles from the bag; then, once the resin has entered its low-viscosity flow window but before it reaches gel point, positive pressure up to 50-100 psi is applied to crush the voids vacuum alone couldn’t remove. Pressure applied after gel point only shrinks a void — it can’t eliminate one.
Key Points
- The least mentioned variable in most articles about using the autoclave for your parts: how the autoclave pressure cycle lines up with your resin’s gel point, not just the pressure.
- Prepreg out time budget isn’t session based, it’s a cumulative pot and every hour on the bench reduce it.
- Autoclave-cured void content as determined by unbiased third party studies indicates in the range of 0.6 – 0.8%. this is far lower than the <1% which commercial data sheets state.
- Vacuum integrity is just as critical to the quality of a finished component as the autoclave pressure, with typically 95% (less than 5% loss in 10 minutes) being important.
What Is Prepreg Carbon Fiber, and Why Does It Need an Autoclave?
Prepreg carbon fiber — sometimes written pre-preg, and part of the broader carbon-fiber reinforced polymer family of materials — is carbon fiber reinforcement, in woven or unidirectional tape form, that has already been pre-impregnated with a partially hardened (B-staged) resin matrix at the material manufacturer’s plant, not mixed by hand at the workshop. These pre-impregnated carbon fiber sheets and tapes are what most people mean when they order “prepreg.”
That’s the biggest difference between prepreg and wet layup, and it’s also what explains why curing prepreg — the chemistry that turns a soft, tacky lamination of fibers and B-staged resin into a solid part — takes a lot more than sticking it in an oven.
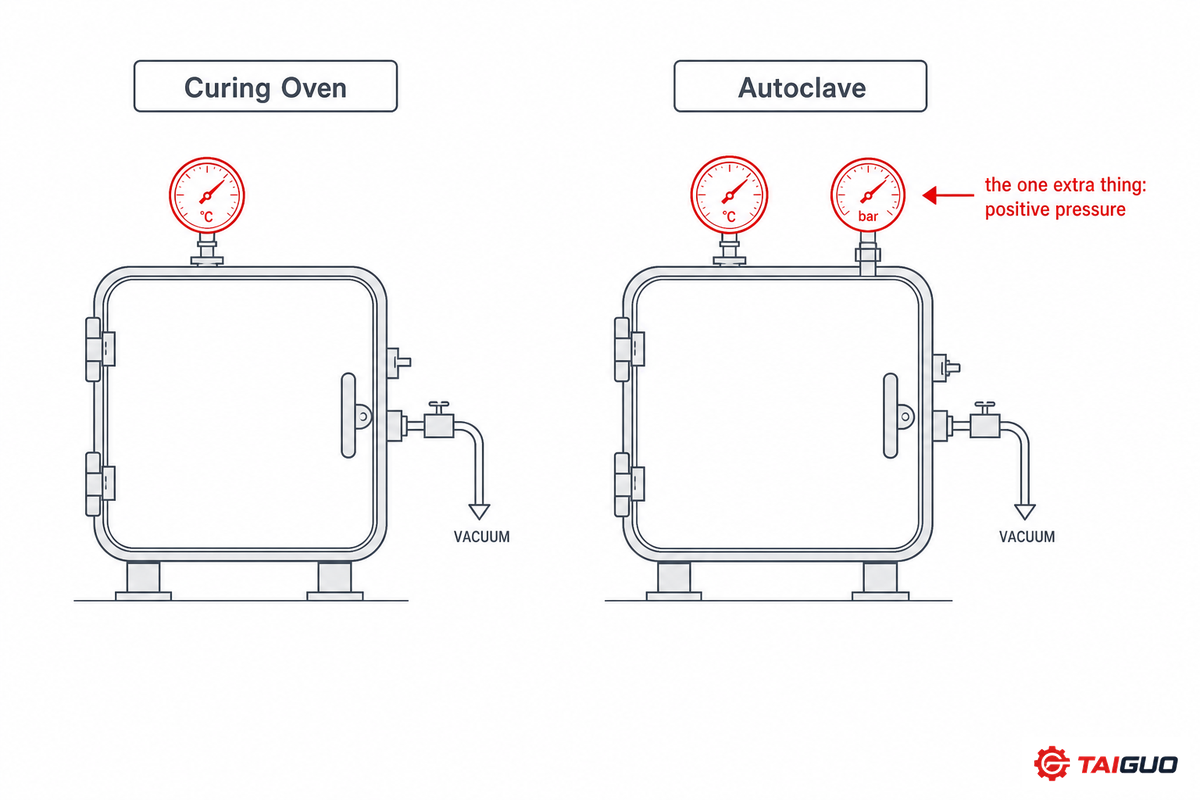
At its core, an autoclave is the same thing as an oven but with one extra capability: positive pressure above atmospheric, typically around 50-100 psi per OSHA’s technical manual definition of autoclave molding. That added pressure — on top of an oven-to-cure environment that’s already circulating heat and vacuum — forces leftover volatile gas or entrapped air to dissolve into the resin or exit through the breather path, which is why autoclave-cured laminates run consistently tighter on void content than laminates cured OOA or vacuum-bag-only. If you’re deciding between the positive-pressure route and a vacuum-bag-only oven cure, our autoclave vs. out-of-autoclave composite manufacturing comparison covers that trade-off in depth; if you’re procuring autoclave equipment itself for an aerospace-adjacent program, our aerospace composite autoclave buyer’s guide is the better fit.
This guide stays on the process itself, what actually happens between unrolling the material and demolding a finished part.
Does Prepreg Need an Autoclave?
Not always. Industry processes for curing prepreg fall into two camps: a conventional curing oven (applying vacuum and heat) or an autoclave (applying vacuum, heat, and positive gas pressure on top to push voids out). Which one you need depends on the void-content tolerance your part design actually requires, not on a blanket rule.
OOA prepregs are formulated to cure well under vacuum-only pressure in an oven, trading some void-content margin for a much lower equipment cost — a programmable oven runs a few thousand dollars, against roughly $70,000 for a small autoclave up to €500,000 or more for large industrial units.
Prepreg Material Fundamentals, Storage, Tack, and Out-Time
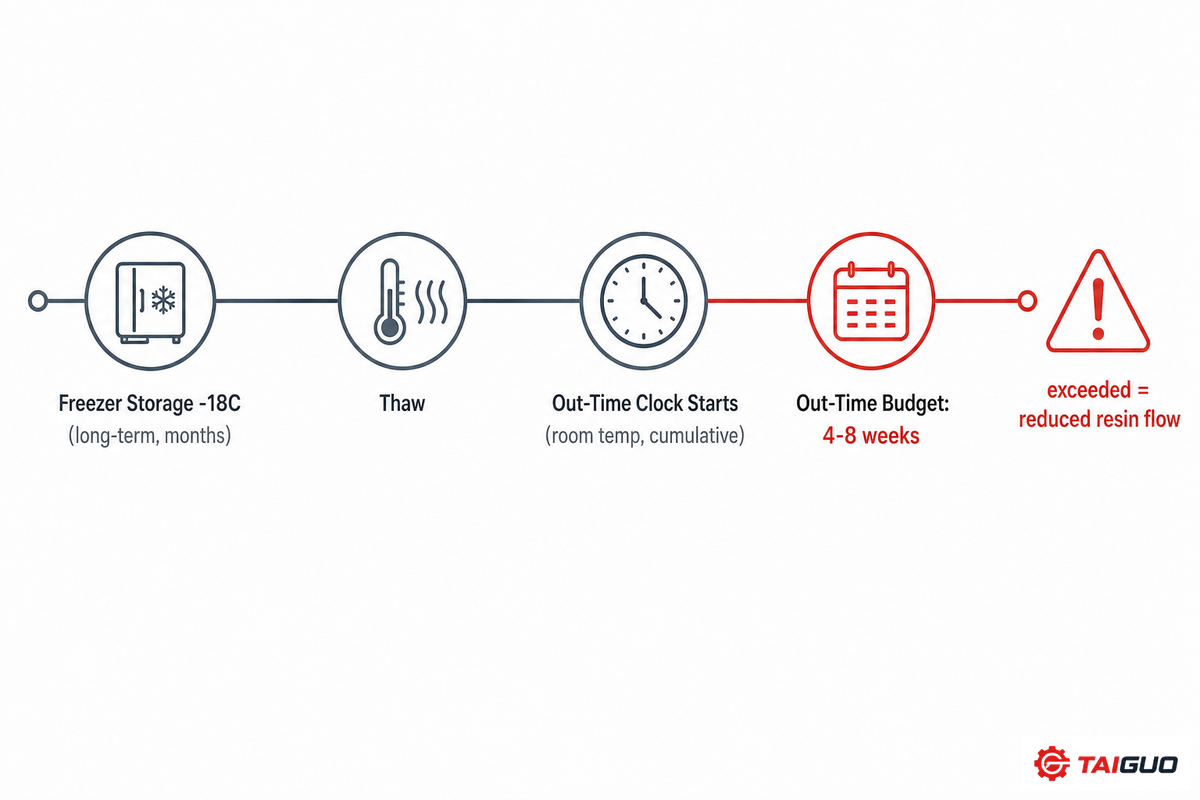
Every downstream defect-prevention step starts with storing the prepreg correctly, so the material hasn’t already degraded by the time it reaches the mold. Two independent manufacturer guides — Gurit’s 2025 Epoxy Prepreg Processing Guide and Hexcel’s HexPly M77 User Guide — stress the same storage regime for uncured prepreg: near-cryogenic long-term storage (Gurit specifies -18°C, or “at least below -5°C” as a floor; Hexcel rates 18 months at -18°C sealed), plus a strictly cumulative out-time allowance once the material is thawed and opened.
That out-time budget isn’t a per-session clock — it’s cumulative, and curing a laminate that’s exceeded it can leave the resin (and its hardener) too viscous to flow properly, reducing laminate quality even when the material still looks and handles fine. Easy Composites, for example, rates its XC110 prepreg at a minimum 6-week out-life and 12-month freezer-life, both comfortably inside that generic range — worth logging either way, whether you’re in a regulated industrial setting where out-time doubles as a logged engineering quality record (as NASA’s own material-control research treats it), or just building a part for yourself.
📑 Engineering Note
The tackiest tape? In addition to controlling the quality of the cured laminate, temperatures of the workshop (15C-20C) can directly impact the tack of the material which can help you maneuver the prepreg around your part efficiently and be more effective at de-bulking but when the temperature rises so too does the tack and so does the risk of entraining air and increasing void content. If your shop runs warmer then expect to have to work harder with the prepreg; not less.
Cutting and Laying Up Prepreg Plies

Templating comes first: temporary patterns are laid onto the mold to shape and trim, then transferred to a durable material such as film or thin metal once they fit. Cutting the prepreg is ideally done with a knife against a metal ruler, not scissors, which tend to gum up with the resin; working around corners, cutting at roughly 45 degrees to the fabric weave pattern helps the material conform to the mould’s curves rather than crinkling — which matters as much for surface finish as it does for strength.
This stage is where visible surface defects most commonly originate. Both manufacturer guidance and independent tutorials point to the same root cause: bridging — a lay-up defect OSHA’s composite-manufacturing process documentation also flags — (the prepreg spanning a detail or corner instead of settling into it), often combined with an incomplete de-bulking routine. Bridges or voids like these are best prevented by laying up from the lowest point outward, using snips to relieve tight corners, and avoiding excess hand pressure, which traps air between plies instead of releasing it. This has become fairly formalized with systems like Gurit’s processing guide, which calls for up to three plies before an initial vacuum bag at 95% for 30-60 minutes, followed by an ambient temperature soak (before the next vacuum cycle) which doesn’t hurt — by the time the last ply is down and the part is laminated, that de-bulk discipline is what separates a clean laminate from a scrap one.
19-КРАТНОЕ Общая ошибка
Skipping or extending the de-bulking interval “to save build time “ leads most often to interlaminar voids in multi-ply parts, and whilst it won’t normally be visible in “green” cured parts and certainly when under load, that trapped air is very easy to see if the part is NDT inspected.
Building the Vacuum Bag, Bleeder, Breather, and Release Layers
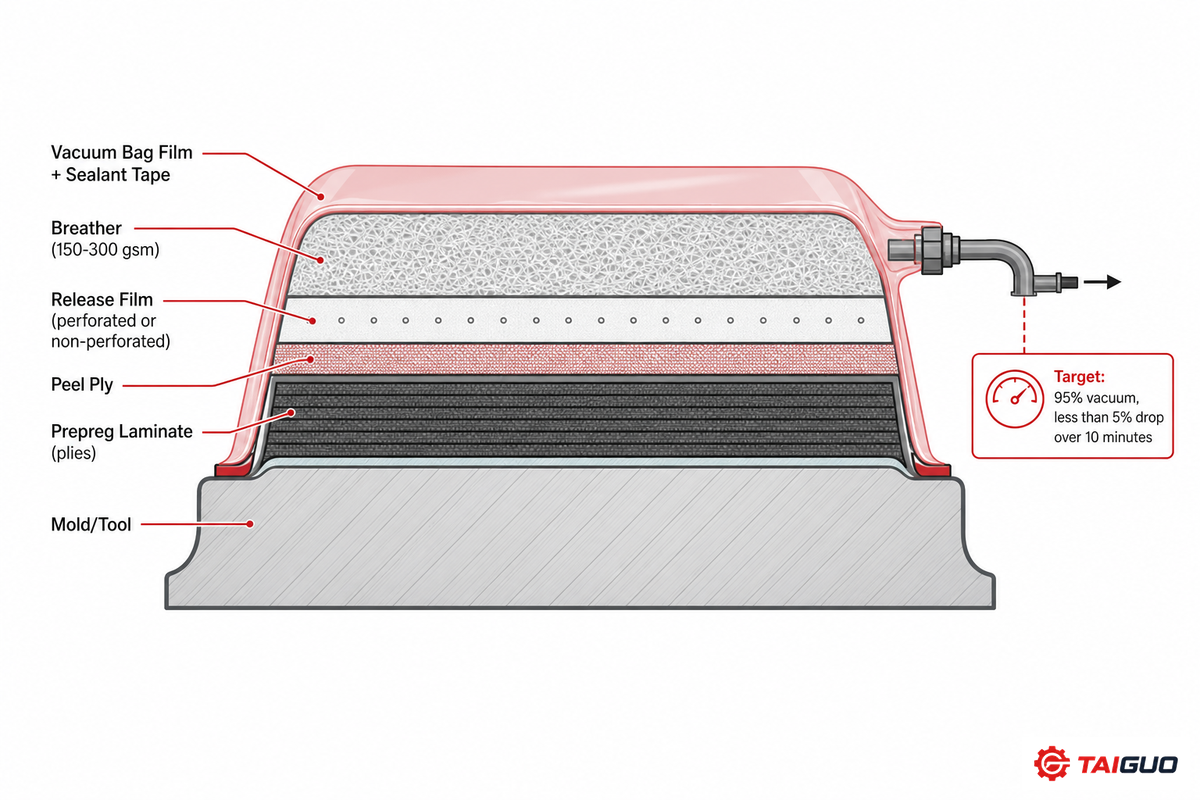
Many of the disposable materials used to lay a vacuum bag are built up in layers, and if they’re sorted or assembled in the wrong order, you risk a scrap part. Cross-referencing Gurit’s recommended sequence against practical workshop tutorials gives the following consistent build order:
| Layer | Typical material | Функция |
|---|---|---|
| Peel ply | Scoured nylon, ~80g/m² | Protects surface; leaves a bondable finish for secondary bonding |
| Release film | Perforated (low-bleed) or non-perforated | Controls resin bleed; autoclave processing typically uses non-perforated film |
| Breather | 150-300 gsm fabric | Air evacuation path across the whole part; can also crush to help mid-part consolidation |
| Vacuum bag + sealant tape | High-temperature, high-elongation film | Seals the stack; must be laid with enough slack (pleats) to avoid bridging over profiled areas |
Before any part ever gets to the autoclave, the vacuum bag needs to prove it’s not leaking. Gurit’s manufacturer guide, one of the better-known suppliers of composite tooling materials, and a generic composite class tutorial agree on this practical target: pull the bag down to nearly full vacuum (Gurit suggests 95 percent, less than a 5 percent drop in a 10-minute leak check, while many equipment tutorials suggest simply 29.9 inHg), then “soak” it under vacuum at least 10 minutes before proceeding to cure. For reference, vacuum bagging and curing at that level is well beyond what a household shop-vac can pull — your vacuum pump needs to be a purpose-built composites unit, not a shop appliance.
19-КРАТНОЕ Общая ошибка
Leak testing errors are concentrated where the sealing tape overlaps the bag. Failing to cover the creased gum tape in a second strip, or failing to stretch the gum tape prior to drawing vacuum, leaves tiny leaks that show up as a slow bleed. An often-overlooked, subtle, and easy mistake: if moisture is allowed to get under the bag, it will flash into steam at near-vacuum and a digital gauge will climb as though it were a real leak.
The Autoclave Cure Cycle, Ramp, Dwell, and Pressure Profile

Once the bag is in place and leak tested, the cure cycle is controlled by four parameters – vacuum level, ramp rate, soak time/temperature, and cure time/temperature – – and it’s these as they apply to the *laminates*, not the cure oven itself – that demand direct laminate temperature monitoring via inserted thermocouples, often with mid-ply specimens for thicker parts.
As part of a worked example in their manufacturer data for their SE84LV epoxy resin system, Gurit provides a precise example, which correlates well with data from a Hexcel HexPly M77 prepreg epoxy system. The two systems are charted independently for clarity:
| Cure temperature | Minimum cure time |
|---|---|
| 80°C | 12 hours |
| 85°C | 9 hours |
| 90°C | 6 hours |
| 100°C | 3 hours |
The general rule of thumb for the table – – every 10 degrees of temperature roughly cuts cure time in half – holds well for most prepreg epoxy systems, with one caveat. Curing at higher temperatures increases the probability of unwanted exothermic reactions, especially in thicker parts, which necessitates holding thick laminates at intermediate equilibrium temperatures (generally 55-65 °C) and relatively slow ramp rates (0.3-2 C / min). If the ramp is too slow, the viscosity never gets low enough; if it’s too fast, an exotherm could occur. Typically, autoclave pressure onprepregs is in the low single digits up to around 6 bar (Gurit spec), about right given the OSHA guide line definition for a low-pressure autoclave (50-100 psi). In most cases, the part will have been under vacuum at least an hour prior to the pressure and heat cycle beginning.
The 20-PSI Gel-Point Handoff
The single most important timing decision in the entire cycle is vacuum-to-pressure transition – and missing the mark on this decision is a far more common cause of failure than failing to reach the correct autoclave pressure. A composites process engineer putting it plainly in an Eng-Tips forum post: applying autoclave pressure will make voids smaller “but they won’t go away” once the resin has gelled and can no longer flow. Independent University of Dayton academic research (Magato, 2019) confirms the same mechanism from a materials science perspective: “At an effective gel point temperature, the prepreg loss[es] ability to sufficiently flow to consolidate to a void volume composite below an acceptable level.” So, it means the vacuum-to-pressure shift must occur before the resin leaves its low-viscosity flow window. A widely referenced rule of thumb for field operations isn’t to release the vacuum until the autoclave pressure has reached about 20 psi, and the resin’s appearance confirms it has transitioned to a liquid. (The magnitude of the pressure still makes a big difference: peer-reviewed studies of cure cycles show increasing autoclave pressure from 0.1 MPa to 0.5 MPa reduces void content by over 99% under controlled conditions – but that pressure can only do its thing if it applied while the resin can still flow and pack tightly against its neighbors.) An incorrectly sequenced, though perfect in temperature and pressure settings, cure cycle can produce a voided part.
“Prepreg lay-ups are a mixture of fibers, resin, volatiles, and air… applying autoclave pressure will make these voids smaller but they will not go away. The best method for removing both air and volatiles is the elevated temperature dwell before applying clave pressure… when pressure is [then] applied, the laminate will go from frothy to fully consolidated because all the non-condensable air has been removed and the volatile bubbles will condense and go into solution in the resin.”
a composites process engineer, Eng-Tips composite engineering forum
19-КРАТНОЕ Важный
Exotherm risk is real, not theoretical: OSHA’s Technical Manual notes explicitly that exotherms may occur in composite curing if the process isn’t controlled correctly — another reason mid-ply thermocouples, not just oven-air setpoints, are the correct thing to monitor during cure.
What’s the Difference Between an Oven and an Autoclave?
Pressure. A curing oven applies heat, circulating air, and vacuum tubing, but its interior stays at regular atmospheric pressure. An autoclave wraps that same oven environment in a sealed pressurized vessel capable of the pressures OSHA documents as standard for autoclave molding (50 to 100 psi range).
Positive pressure, once the resin is flowing sufficiently, is the deciding factor for bringing void content down to acceptable limits reliably across the part’s complexities — especially in thicker sections, curves, and corners where air has room to get trapped.
Common Cure Defects and How to Catch Them
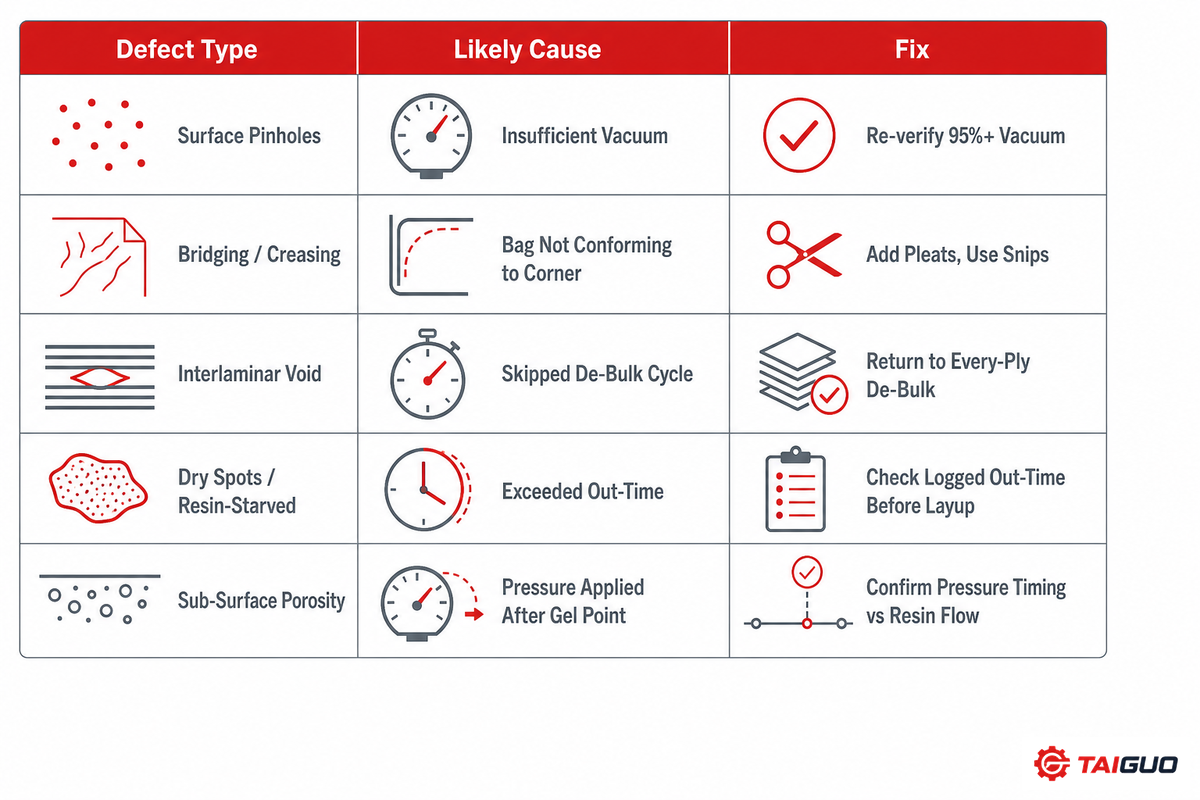
Autoclave-cured carbon fiber will produce void contents far below 1 percent in the autoclave test coupons: The most rigorous peer-reviewed cure-cycle research studies report 0.6-0.8 percent void contents for real autoclave parts – an even smaller percent than the widely cited “under 1 percent” value in some commercial literature. However, an autoclave test article won’t necessarily automatically produce such a low-content result. Achieving that lower void content simply requires that each process listed above is done correctly — and catching it when one isn’t often means ultrasonic C-scan inspection (NASA has published research on automating this scan process) rather than a visual check alone.
Fortunately, when a defect occurs at any step, its signature is typically recognizable.
Why Does Autoclave-Cured Carbon Fiber Yield Less Than 1% Void Content?
Three mechanisms layer on each other: a near-full vacuum pull (29-30 inHg, or 95%) evicts most entrapped air before any pressure is applied; correctly-timed autoclave pressure then compresses the laminate and forces residual air back into the resin; and the resin system is engineered to hold low viscosity long enough to actually wet out the fiber bed under that pressure.
Published figures for autoclave-cured aircraft-quality composites (T700/T800-class systems) quote <1% void content, against roughly 2-5% for compression molding and 3-8% for wet layup under vacuum only — a real and meaningful gap between processes.
| Defect Type / Symptom | Likely cause | Fix |
|---|---|---|
| Surface pinholes | Insufficient vacuum during de-bulk; trapped air at surface ply | Re-verify ≥95% vacuum; add a dedicated debulk cycle before final bag |
| Bridging marks / creasing at corners | Bag or ply not conforming into tight radii | Add pleats for slack; use composite snips to relieve corners during lay-up |
| Large interlaminar void | Skipped or extended de-bulk interval on a multi-ply stack | Return to every-ply (max 3-ply) de-bulk cadence, 30-60 min under full vacuum |
| Dry spots / resin-starved area | Resin exceeded out-time before cure, viscosity too high to flow | Check logged out-time against datasheet budget before layup, not after cure |
| Resin-rich surface / excess bleed | Wrong release film (perforated where non-perforated was needed) or over-bled cure | Match release film to autoclave-vs-oven cure per system datasheet |
| Uniform sub-surface porosity | Pressure applied after resin passed gel point (see the 20-PSI Gel-Point Handoff above) | Confirm pressure/vent timing against resin flow window, not just oven setpoint |
| Print-through / surface distortion after demold | Demolded before laminate cooled fully | Cool laminate below ~50°C before attempting demold |
| Seal-line leak during vacuum pull-down | Un-tensioned or uncovered tape crease | Re-tape crease, tension before pull-down, re-run leak test |
| Internal delamination not visible at surface | Hidden void or ply separation beneath surface plies | Ultrasonic C-scan or CT-scan inspection — visual/dimensional check alone won’t catch it |
Prepreg Autoclave vs. Alternatives, Wet Layup, Compression Molding, OOA
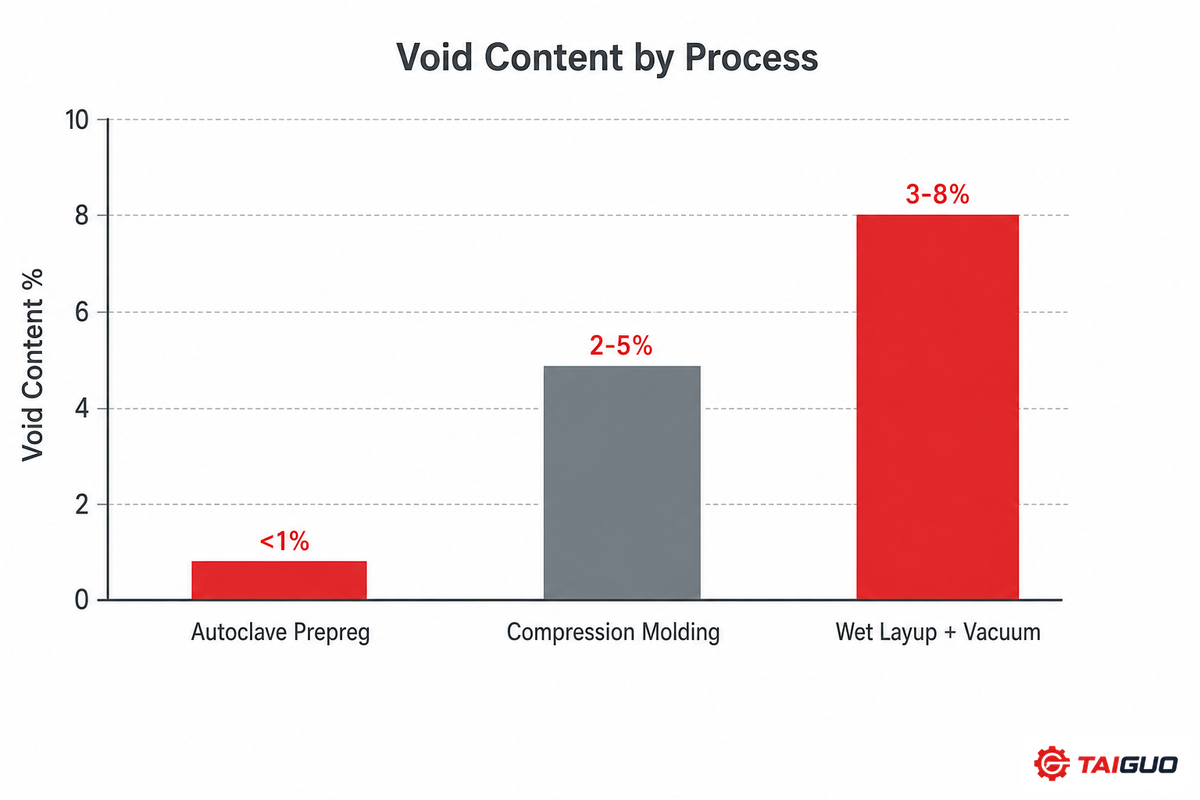
An autoclave-cured prepreg composite isn’t the only way to make a part from carbon fiber, nor is it the best way for all purposes. Wet layup – using dry carbon fiber and mixing the resin in-situ – saves money compared to the prepreg cost markup but results in about 3-8 percent void content at best even with a vacuum bag, a long way from an autoclave process. Compression molding uses fiber-chopped or with random-orientation and the associated resins placed under a closed mold which is pressurized; this gains speed (cycle time can range from 10 min to a full day) over autoclave processing (2 to 6 hours), but uses randomly aligned fibers that compromise stiffness and load-carrying capacity relative to an aligned prepreg.
Out-of-autoclave prepreg carbon systems split the difference: it’s still a pre-impregnated material, engineered to cure well under vacuum-bag-only pressure in an oven, without the capital cost of a large pressure vessel, though some practitioners report OOA holding up less consistently on non-flat, complex-curvature parts than a true autoclave cure. If your decision is specifically autoclave-vs-OOA at the process-strategy level, that trade-off get the full comparison treatment in our autoclave vs. out-of-autoclave composite manufacturing guide.
Industry Outlook, What’s Changing in Prepreg Cure Practice
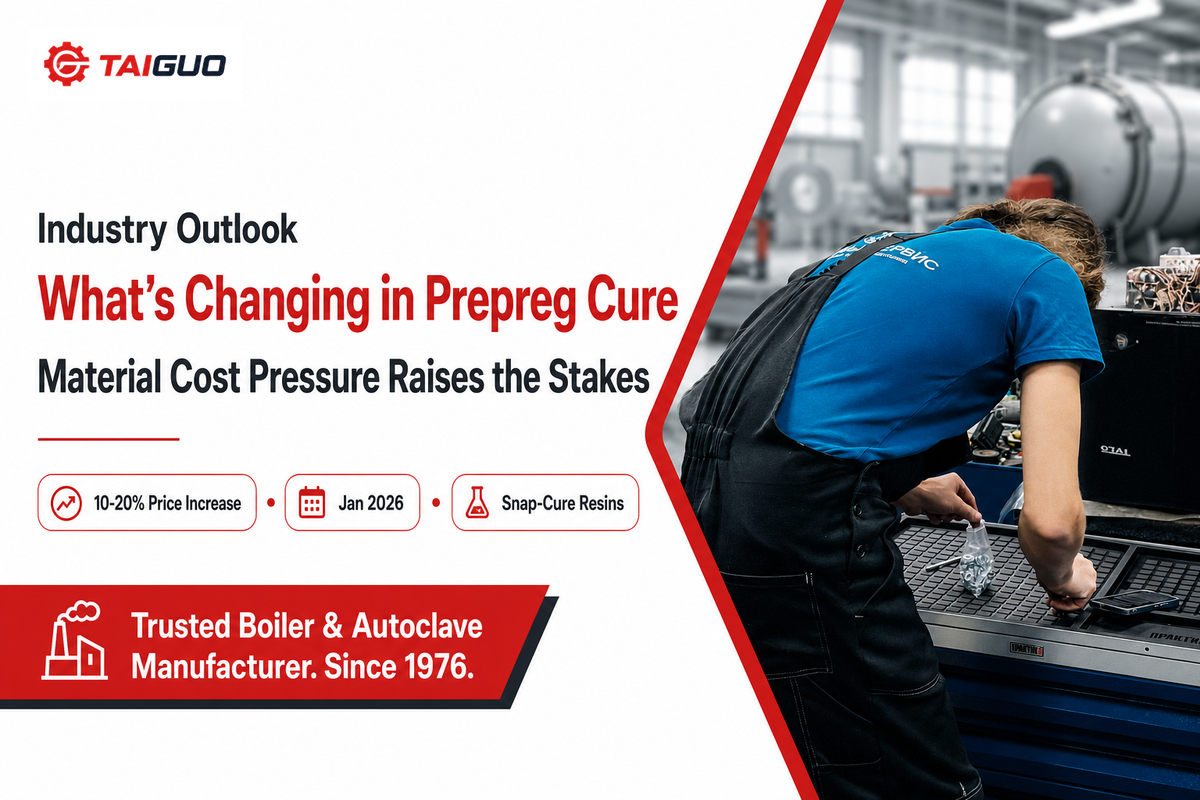
The cost of making the process go wrong just went up. Toray Industries in December announced a 10%-20% price increase for TORAYCA carbon fiber, prepreg, fabric, and laminate products on Jan. 1, 2026 (effective for Jan. 2026 shipments). A shop running prepreg autoclave cure should understand this means the true cost of every scrapped or reworked part gets a significant material value jump on any de-bulk failure or poorly timed pressure hand-off versus a year ago – that’s an argument for the discipline in this guide, not an abstract argument. If you’re planning material buys and shop schedule into 2026, factoring in this increase on any TORAYCA-based prepreg system makes sense.
On the material development side, snap-cure epoxy prepreg technology – designed to cure in minutes rather than hours (more akin to a metal stamping process) – is an active and emerging development in the prepreg space, with several manufacturers now shipping systems built around the concept. This is a genuine technical trend to keep an eye on, but doesn’t fundamentally alter the prepreg processes outlined here: a snap-cure system still requires properly sequenced vacuum, pressure, and a gel-point-aware hand-off — it just happens in an abbreviated time frame, and the finished carbon fiber components still have to pass the same defect checks. Shops operating past small-lot volumes on any of these curing applications – any composite, AAC, and others – eventually run up against the same equipment question, a process shop-size oven or a general-use промышленный автоклав designed for the pressures and volumes demanded by the production process. Wider market estimates for the carbon fiber prepreg market vary considerably between research firms, from roughly $8.7 to $12.8 billion globally in 2025, to as high as $22-23 billion by the early 2030s, per some reports-they’re reported here for general context and aren’t a substitute for your own business case.
Об этом анализе
This process walkthrough was compiled from manufacturer processing guides (Gurit, Hexcel), peer-reviewed cure-cycle research, OSHA’s own technical documentation, and long-form practitioner discussion on composites engineering forums, cross-checked against each other rather than relied on individually, because commercial tutorials and blog posts in this space vary widely in how precisely they cite their numbers. Where a figure came from a single commercial source without independent confirmation, that’s noted in the text rather than presented as settled fact. Отзыв технической команды Taiguo Boiler.
Часто задаваемые вопросы
Q: What is a prepreg autoclave?
Просмотр Ответ
Промышленный автоклав - это сосуд под давлением и нагревательная камера для отверждения предварительно пропитанных материалов, таких как углеродное волокно и стекловолокно (препреги), посредством приложения как внутреннего давления (обычно от 50 до 100 фунтов на квадратный дюйм, согласно техническому определению автоклава OSHA), так и тепла. Автоклавы принципиально отличаются от стандартных промышленных печей (которые применяют тепло и часто вакуум, но поддерживают атмосферное давление) тем, что включают положительное давление для более эффективного прессования ламинированной матрицы в процессе отверждения (для более низкого содержания пустот и более высокого качества с толстыми или сложными деталями).
Q: Can you autoclave carbon fiber?
Просмотр Ответ
Yes – the standard of choice for prepreg carbon fiber and used across aerospace, motorsport, high-performance automotive – prepreg carbon fibre parts are formed by draping and stacking prepreg plies, bagging and placing them in the autoclave where a heat, vacuum, and pressure cure cycle consolidates the material. While non-prepreg forms of carbon fibre can be auto-clave-cured via wet layup or resin infusion, prepregs are pre-formulated systems designed specifically to work in the autoclave.
Q: How much does a carbon fiber autoclave cost?
Просмотр Ответ
Industrial composite-curing autoclaves commonly range from roughly $70,000 (about £50,000) for a small unit up to €500,000 or more for large industrial vessels, driven mostly by chamber size, pressure rating, and the door/access mechanism a pressure vessel of that scale requires. That’s before ongoing costs like regular pressure-vessel inspection and energy use for the heating cycle. For a full breakdown of sizing considerations and procurement decision factors for aerospace-grade equipment specifically, see our aerospace composite autoclave buyer’s guide.
Q: What is the difference between autoclave prepreg and compression molding?
Просмотр Ответ
In order for to achieve the highly aligned-directional stiffness that prepregs are known for, they must be consolidated under high positive pressure at elevated temperatures.
Prepregs are provided in the form of large sheets to be cut and stacked in an aligned, directional fiber sequence before vacuum bagging and processing in a heated pressure vessel. Whereas in compression molding ( chopped or randomly-oriented fibers, with resin are heated in a closed press) process, the pieces are heated in high-pressure molds-a far quicker process that requires roughly 10 minutes to 24 hours to cure but delivers less-directional stiffness than an auto-clave-cured prepreg structure.
Q: What do you mean “out of autoclave prepreg”?
Просмотр Ответ
Out-of-autoclave (OOA) prepreg is a prepreg material specifically engineered to cure well under vacuum-bag-only pressure in a standard oven, without needing an autoclave’s positive gas pressure. See our full autoclave vs. OOA comparison for the complete trade-off breakdown.
Q: Do you need an autoclave for carbon fiber?
Просмотр Ответ
Not necessarily – depending on the amount of void you are willing to tolerate, your budget and part complexity you might choose a wet layup, OOA prepreg, or compression molding technique. You might consider this method when you really need lowest void content and maximum in-plane stiffness.
Ссылки и источники
- OSHA Technical Manual, Section III: Chapter 1, Polymer Matrix Materials: Advanced CompositesU.S. Occupational Safety and Health Administration
- Development of a Methodology for Characterizing Reaction and Flow Behavior of Resins (Magato, 2019)University of Dayton eCommons
- A Review on the Out-of-Autoclave Process for Composite ManufacturingJournal of Composites Science (MDPI, peer-reviewed)
- Study of Out-Time on the Processing and Performance of Carbon/Epoxy Prepreg (Miller, 2010)NASA Technical Reports Server
- Toray to Increase TORAYCA™ Carbon Fiber PricesToray Industries, Inc. official press release
- Resin pressure evolution during autoclave curing of epoxy matrix compositesJournal of Reinforced Plastics and Composites (SAGE, peer-reviewed)
- ASTM D2734 / D3171, Standard Test Methods for Void Content of Composite MaterialsАСТМ Интернэшнл
Связанные статьи
- Industrial Autoclave Equipmentcustom-built pressure vessels for composite, AAC, and industrial curing applications
- Aerospace Composite Autoclave: Sizing, Specs & Certificationequipment buyer’s guide covering chamber sizing and AS9100/NADCAP certification landscape
- Autoclave vs. Out-of-Autoclave Composite Manufacturingfull process trade-off comparison
- Автоклав для блоков AACindustrial autoclave applications beyond composites
- Автоклав для консервации древесиныanother pressure-vessel curing application on the same equipment platform
- AAC Block Manufacturing Plant Guidesetting up an autoclaved aerated concrete production line

![Руководство по настройке завода по производству блоков AAC [2026 г.]](https://taiguo-steamboiler.com/wp-content/uploads/2026/07/aac-block-manufacturing-plant-featured-768x512.png)


![Руководство по настройке завода по производству блоков AAC [2026 г.]](https://taiguo-steamboiler.com/wp-content/uploads/2026/07/aac-block-manufacturing-plant-featured-150x150.png)